
Intermarkets' Privacy Policy
Donate to Ace of Spades HQ!
aceofspadeshq at gee mail.com
Buck:
buck.throckmorton at protonmail.com
CBD:
cbd at cutjibnewsletter.com
joe mannix:
mannix2024 at proton.me
MisHum:
petmorons at gee mail.com
J.J. Sefton:
sefton at cutjibnewsletter.com
The Morning Report — 7/ 29 /26
Daily Tech News 29 July 2026
Tuesday Overnight Open Thread - July 28, 2026 [Doof]
Sick Day Cafe
House Committee Issues Subpoenas to Far-Left Chinese Asset Megadonor Neville Roy Singham
Families of 9/11 Victims Want Terrorist-Loving Communist Zohran Mamdani Banned from 25th Anniversary Remembrance
Mitch McConnell Released from Hospital, But Still Not "Medically Cleared" to Do His Job; Democrat Governor Andy Beshear Demands He Return to Senate or Resign
Revealed: Five Months After Fauci Got Vaccinated, He Suffered a Pulmonary Infarction, an Adverse Effect Associated With the "Vaccine."
He Kept This a Secret.
Zwonitizer Tapes Demonstrate Biden's Serious Cognitive Decline; Massive Amount of NSA/CIA Redactions Show Biden Sharing Tons of Classified Information with a Civilian
Jon Ekdahl 2026
Jay Guevara 2025
Jim Sunk New Dawn 2025
Jewells45 2025
Bandersnatch 2024
GnuBreed 2024
Captain Hate 2023
moon_over_vermont 2023
westminsterdogshow 2023
Ann Wilson(Empire1) 2022
Dave In Texas 2022
Jesse in D.C. 2022
OregonMuse 2022
redc1c4 2021
Tami 2021
Chavez the Hugo 2020
Ibguy 2020
Rickl 2019
Joffen 2014
maildrop62 at proton dot me
Gun Thread: End of January Edition!

Howdy, Y'all! Welcome to the wondrously fabulous Gun Thread! As always, I want to thank all of our regulars for being here week in and week out, and also offer a bigly Gun Thread welcome to any newcomers who may be joining us tonight. Howdy and thank you for stopping by! I hope you find our wacky conversation on the subject of guns 'n shooting both enjoyable and informative. You are always welcome to lurk in the shadows of shame, but I'd like to invite you to jump into the conversation, say howdy, and tell us what kind of shooting you like to do!
Aaannnd just like that we find ourselves at the end of January, hence the title of this week's Gun Thread. You see, if it were the beginning of January, we'd have called it something like "Beginning of January Edition." But it's not, so we didn't. Frankly, it's all very complicated and is why someone like me is necessary to help figure these things out.
Programming Note: I probably won't be around much tonight because of a family dinner thing we have planned. Y'all please don't burn the place down, 'kay?
With that, step into the dojo and let's get to the gun stuff below, shall we?
Last week we started to look at reloading. Show of hands - is anyone interested in picking up this part of the shooting hobby? This week we have Part Dos of the series on setting up gear down-thread, so it doesn't overwhelm the rest of the content for those misfit, deviant girly-men who aren't interested in reloading and who do not understand how much the range babes are attracted to the hombres who roll their own.
Guns of the Horde
Welp, our pal Ed L has done it again. This week he taunts us with a new Colt Python snubby!
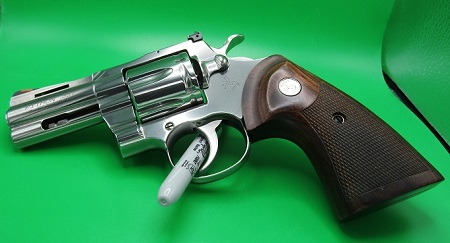
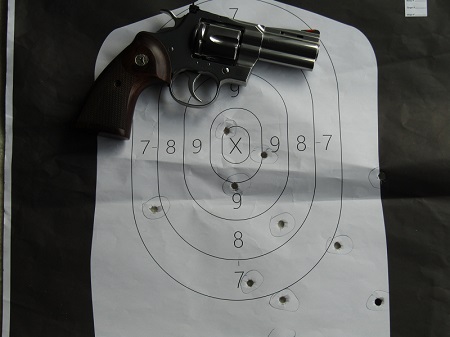
I picked up my new Colt Python snub nose (3" barrel) revolver and headed out for the range. 158 grain FMJ from Fiocchi in .357 Magnum are a bit of a handful fired out of this revolver. The large grips are crucial for keeping control when firing .357 Magnum in double action.
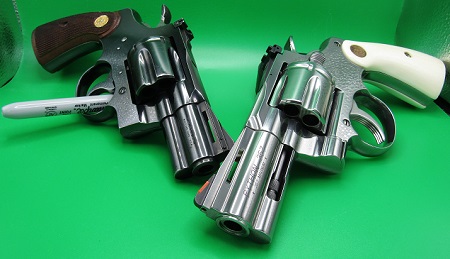
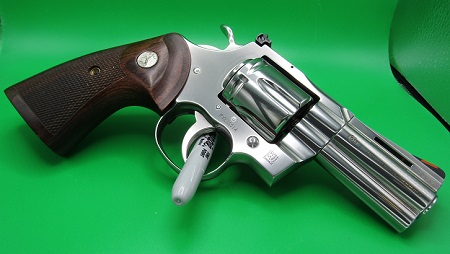
.38 Special (130 grain FMJ here) is much easier to control compared to .357 Magnum. Muzzle blast is significantly less, and the revolver doesn't beat up on you nearly as much. The new Python scrubs up quite nicely too. In this picture, it wears ivory service grips from Nutmeg Sports. It's shown for contrast with a vintage Colt Python snub nosed revolver from the 1960s finished in Colt's Royal Blue.

So, a careful count of the Colt Pythons in the center picture above returns an approximate number of two. That's right, Ed L was not satisfied with one of these beautiful revolvers, so he went out and got another!
Next up, our pal Nevada Dave shares a rifle that came up in the comments last week, a Colt SP1.
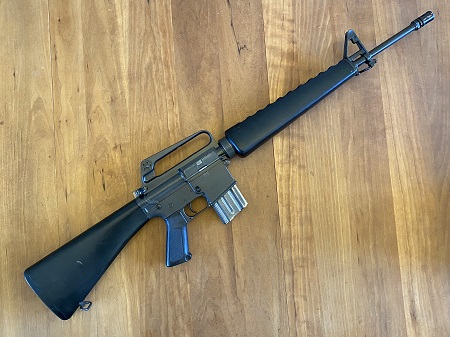
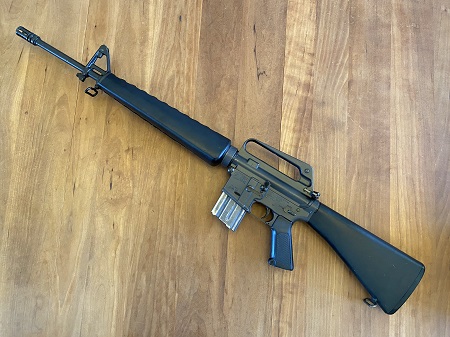
This is my Colt AR-15 SP 1, she's a late seventies model. Notice the "slab side" lower receiver with no fence around the mag release button. Also, on the upper receiver no forward assist and no shell deflector. The bcg does have serrations for the forward assist. We have the triangular hand guards, 20-inch pencil barrel 1:12 twist with birdcage flash hider and an ominous bayonet lug. Peep rear sight adjustable for windage and front post adjustable for elevation. The rear receiver take-down pin is similar to today's AR but up front is a pair of screws. I don't know the definitive answer as to why that is.As is it's a handy rifle, amazingly light compared to standard service rifles now. It shoots around 2 1/2-inch groups at 100 yards until the barrel heats up, then it starts to really open up, a 50% IPSC target @100 becomes a challenge. The recoil is exceptionally light and smooth more so than my newer AR's with 16-inch barrels and mid length gas tubes. The trigger is not very good compared to trigger groups available today.
I remember back in the day the old guys had M1 Garands and M1 carbines, friends had Ruger mini 14's that were much more popular, my "Mattel" rifle was looked down on!
Weasel has one of these too, and not only is it a great rifle, but has also turned out to be a great investment with prices now in excess of $2k. Amazing!
Range Time!
Next up, pur pal No One of Consequence shares details of his inaugural range trip!
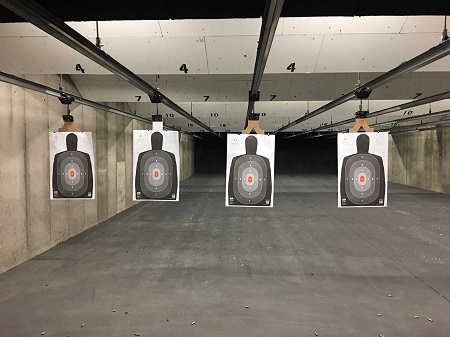
I had, in previous weeks, pestered the Horde for pistol recommendations, as I was planning my first ever trip to a gun range for an Intro to Pistols class, followed by a brief bit of range time. And of course the Horde came through in spades! I had to reschedule my class, but was able to get to the range this past week. The class covered the basics, and was brief. I already knew much of what the instructor talked about, mostly from what I absorbed from folks talking guns on various threads.I ended up going with what the range folks recommended, and used a Glock 19. The instructor said the people are often startled the first time they fire a gun, and so it was for me. The first target was at 5 yards, and then 7.5 yards, 10 yards, 12.5 yards, and 15 yards - 10 shots each. It was the same target each time, so I don't know how I did at each distance. I can say I hit the silhouette most of the time, and don't think I ever missed the target completely, though I clearly was pulling down and to the left.
I had fun at the range, and plan to get back sometime to improve my shooting so thanks so much to the Horde for their excellent advice!
Excellent, No One of Consequence! Range time is fun time, don't you think? Please let us know how the next trip goes!
Next our pal Xenophon shares a multiple target drill he recently invented!
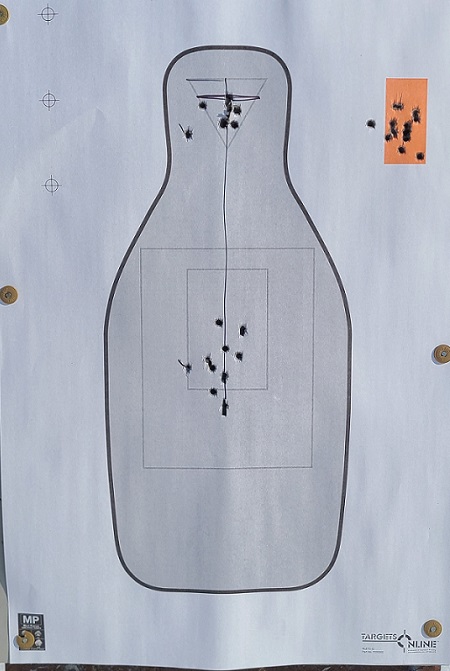
The reaction course is relatively simple: two Q targets, separated by one lane. Distances are 10/7/5 yards, starting at the 10. The shooter has 20 seconds to put two in the small box of the body section of target 1, the body section of target 2, the head triangle of target 2, the head triangle of target 1, 1 in the orange rectangle of target 1, and 1 in the orange rectangle of target 2 (so, 2-body 2-body 2-head 2-head 1-OR 1-OR). If you don't want to spend that many rounds, make it one each.
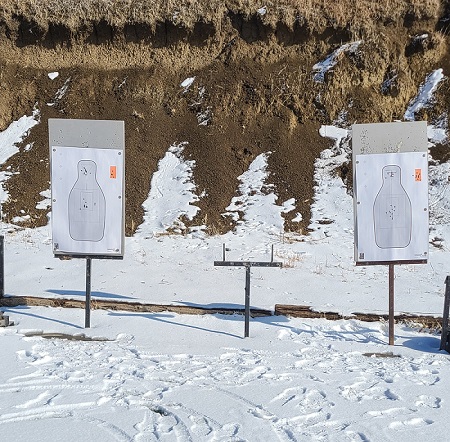
Hits are only in the small box, the triangle, the orange rectangle, or within ½ an inch of the 'fatal T' line. As the range shortens, so does the time, to 15 seconds and 10, respectively. The time limit is meant to be challenging but attainable One of my co-workers who breathes, sleeps and eats gunfire got all hits from the 5 in 6 seconds. Afterwards, we critique based on the shooter's hits or misses, observed technique and offer feedback. If they're hesitant the first time, just have them run it without time to see how they do.
The next is a system we call 'Blackwater' and back when there was lots of 911 money, Blackwater actually came out and set this up for us. So, 12 six-inch plates, 6 per side, with 1 steel silhouette between them. Each shooter has 3 magazines, loaded 6/6/6. From the 10-yard line, the shooter has 45 seconds to knock down all plates and hit the silhouette at least once. This is used as a 'separator' test for our tactical guys, because it is so easy to screw it up. A hit on a plate doesn't always knock it down. Sometimes it bounces back up. Worse, a miss makes everyone freak out, especially if you have observers. It seems like a vast amount of time and ammo, and it evaporates quickly under stress.

Very nicely done, Xenophon! That looks like an excellent drill. Thanks!
It should come as no surprise that Weasel is a sucker for historical photos, and here is a doozy from our pal WTM
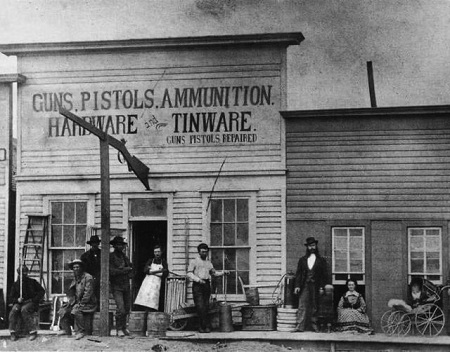
Dodge City 1872
Fun Fact: The series Gunsmoke is one of the few things I'll watch. on TV. In B&W, of course. Great find, WTM!
OK! OK!
Will you guys please stop emailing me for videos on South Korean shovel production? This is the Gun Thread, not the damn South Korean Shovel Thread!
Reloading 101- Part Dos: Gear Setup 4/14/2019
This week we're going to start setting up some of the shiny new reloading gear we discussed last week. But before we do, a couple more housekeeping items. As a reminder, please do not list specific load powder charge weights when discussing reloading. If you like, you can mention the powder you're using and the velocity, but unlike the food thread, let's keep the specific recipes to yourself. Thanks.
Next, throughout this series, I am going to discuss reloading for the .38 Special. It's an easy cartridge to work with and generally forgiving for the new reloader. However, the concepts discussed here are applicable to any straight-walled handgun cartridge. We will save rifle cartridge reloading for another time. 'Kay?
Finally, I'd like to reiterate this material is intended for the novice reloader. We're fortunate to have reloaders here with years of experience, but for now let's keep the information basic.
One of the first considerations is where to set up your reloading operation. I know benchrest shooters who reload in their vehicles at the range, and others with enormous setups occupying large spaces at their home. Let's assume you will at least be indoors and after that, all that's really required is a modest amount of workspace if you're using a basic single-stage press. What makes a good reloading location? I'd say there are a few key elements. A quiet place to work undisturbed and uninterrupted, in a comfortable and climate-controlled area. You will need a reasonably solid bench or countertop workspace about 36 to 48 inches wide. This is just a approximation and you may find you need slightly more or slightly less space, depending on how you like to work. If you have a basement area where you can spread out that's great, but I want to assure those in a smaller home, an apartment or condo for example, can reload just as effectively as everyone else. A kitchen counter will work fine. For those in that situation, I will give you an idea below for keeping your reloading setup easy to breakdown and store in a medium size storage tub.
Tips for selecting and reloading in your work area:
- locate the bench away from direct air flow from forced air vents, ceiling fans, etc.
- store powder and primers in original containers in a cool, stable environment.
- whenever possible, choose a quiet area, free from foot traffic and other distractions.
- plan your reloading session so you can complete different steps entirely, with logical break points.
- never, ever, ever have more than one type of powder on the bench at a time.
- always check your work. If something looks or feels funny, stop and investigate.
The Press

I'm going with the assumption you have purchased a single stage reloading press like the one shown above. You will note that it's a sturdy piece of steel designed to be bolted to the edge of a workbench. I'm lucky to have a nice, but by no means expansive, countertop workspace in our laundry room. It's in a quiet part of the basement without distraction, and WeaselWoman was nice enough to get all of her stupid laundry shit out of the way and allow me to take over what's supposed to be a folding area. I did not want to drill mounting holes in the countertop, so I mounted my press(es) on a short double thickness of 1"x 6" pine board and use two 4" C clamps to fix the assembly into place on the countertop. Just countersink the bolt heads so the board rests flush, and it's every bit as solid as if it were bolted directly to the countertop. When configured in this manner, the gear can be easily stored away between reloading sessions. The important point is to mount the press to the board or directly to a bench in a way so the ram function of the press is not impeded, so play around with the setup and operation before you start drilling holes!
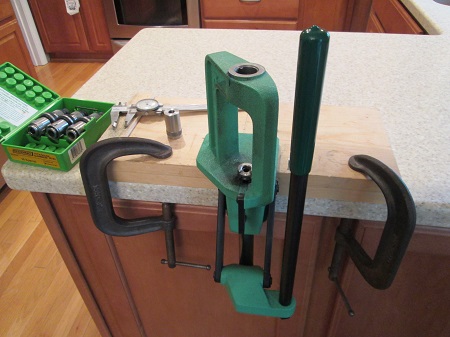
Press setup on kitchen counter
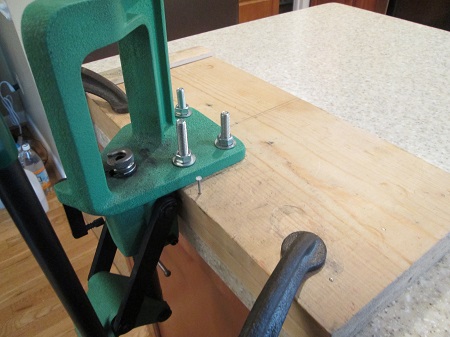
Press setup alt view - note bolts

Countersunk holes on bottom of base
Your press is the primary tool on your bench. I'm right-handed so I have my press on the right side of the workspace. The press is just that; a device with a mechanical ram that moves up and down when the handle is pulled. It doesn't do much by itself without reloading dies, which screw into the top of the press and perform different functions. Brass cartridge cases are shaped and resized under pressure produced by the ram and die, and in order to achieve the necessary small tolerances they need to be setup carefully. You will check the die function with precision measuring tools such as the calipers and case gauge included on last week's shopping list.
Reloading Dies - What the heck are they and why do I need them?
Reloading dies size and shape the brass cartridge and are caliber specific so, for example, you cannot reload .45 ACP cartridges with dies made for the .38 Special. This means you need separate dies for each caliber you plan on reloading. In order for a new or used case to be reloaded, it first needs to be sized to certain specifications for the cartridge. These specifications are maintained by SAAMI the organization that makes sure a specific cartridge fits properly into the specific chamber designed to fire it. An extensive catalog of cartridge specifications are maintained online and it's a great resource.
General Die Setup and Adjustment
Most dies simply screw into the top of the press. Hornady presses use an additional sleeve that locks into the press that makes changing dies a little quicker, but they all work basically the same way.
NOTE: Dies are shipped from the manufacturer with a coating of something as a rust inhibitor which should be removed before they are used the first time. Simply take apart the dies and spray with a cleaning solvent; Ballistol, WD-40, Hoppes 9 - whatever you have handy, and wipe clean (with a cloth!). It's not a bad idea to keep them very lightly oiled if you are in a high humidity location. Just a light spray is all you need, which can be removed before you use them again with a chamber mop.
To setup a die for the first time, perform the following steps:
- insert appropriate caliber press shellholder into the top of the ram. It just snaps into place.
- without a cartridge in place, lower the handle to raise the press ram to it's uppermost position.
- screw the die body into the press, so the bottom of the die just touches, or is very slightly above the top of the shellholder.
- screw the locking ring on the die body down until it rests on the top of the press and tighten the set screw.
- as you begin work, you may find small adjustments are necessary - simply loosen the locking ring, adjust the die, and tighten the ring and set screw.
- sometimes when the locking ring is set it makes the die difficult to remove from the press. A few whacks on the locking ring with a rubber mallet will usually do the trick.
- once properly set, you should not usually need to make additional adjustments. Simply screw in the die until it's stopped by the locking ring. Specific considerations for individual die setup are discussed below.
A properly set die will perform its function at the top of the ram stroke, just as the lever begins to cam over and stop, and without a great amount of force. This is an important point. An improperly set die will return inconsistent results due to the application of variable force, and possibly damage the case. As you gain experience, you will notice many steps are done based on the feel of the amount of force required to complete them. Anytime anything changes, STOP WORKING, and investigate. Each step should be completed smoothly and without a huge effort. If you find yourself needing to use a lot of muscle, then something isn't working right and needs to be corrected.
A good video on die setup is here. A couple of points - the guy in the video has various interpretations of the word "cannelure" (can-ne-lure), and also doesn't seem to embrace the use of the die locking ring. Other than that, it's a fairly decent look at the process of setting up the 3 dies in your set. The press he is using is slightly different design, but the die setup instructions all still apply. There are a bazillion videos on reloading, so look around if this guy bugs you. If you find yourself actually doing any of this and have questions, please feel free to email Gun Thread technical support who will be happy to help!
You'll recall last week we talked about the dies and the functions they perform in the reloading process. Let's review them in a little more detail now, including ways the setup differs among the three dies.
Sizing Die
When a cartridge is fired, it expands against the chamber wall to seal the breech, then snaps back a little but not quite all the way. Depending on the chamber, the fired case may be several thousandths of an inch (.00X") larger in diameter than it was before firing. The sizing die simply returns the case to the correct pre-fired diameter. You will notice a pin sticking out beneath the sizing die. That's the de-capping pin and it punches out the used primer. In a new or unprimed case the pin is just along for the ride. The screw and smaller locking ring on the very top of the die are used to replace or make adjustments if needed to the de-capping pin depth which should be set to just pop out the used primer. To setup a sizing die just follow the steps above.
Expander Die
The second, or expander die is used to very slightly flare the mouth of the case to accept the bullet. Set up the die as described earlier so the bottom of the die is barely touching or just above the shellholder. Next, adjust the expander plug inside the die using the smaller screw and lock ring on the top of the die. When properly adjusted, the expander die will flare the case mouth by a few thousandths of an inch to accept the bullet. It's a barely perceptible amount to the naked eye, but it allows the bullet to begin the seating process without being shaved by the edge of the case mouth. Use caution to avoid oversizing the case which can lead to reduced case life.
Seating and Crimping Die
The third die in the set performs two operations. It seats the bullet to the desired depth and applies a slight crimp to the case mouth to hold the bullet in place. There are two steps to setting up a seating/crimp die. First, back the seating stem screw on the top of the die counterclockwise, or up, most of the way and then screw in the die body into the press until the bottom is a couple of turns above the shellholder. Next, place a dummy (unprimed and without powder!) sized and expanded case into the shellholder and place a bullet on top. Now cycle the press and advance the seating stem by small increments until the bullet is seated to the desired depth (more on this later) checking the overall length with calipers or using a case gage. Now back out the seating stem several full turns.
Leaving the cartridge on the ram in the full up position, screw in the die until you begin to feel the resistance of the cartridge. Lower the ram and advance the die in small increments, raising the ram after each adjustment and checking until the desired crimp is achieved. Bullets with a cannelure (groove) will require more downward adjustment to achieve a "roll" crimp, where the case mouth is very slightly curved into the cannelure. Cartridges which headspace on the case mouth (.45ACP for example) require less downward adjustment of the die body to achieve a "taper" crimp. Do not roll crimp jacketed bullets without a cannelure as you may damage the jacket, and again, do not roll crimp any cartridge that headspaces on the mouth of the cartridge, taper crimp these instead. Now lower the locking ring and tighten the set screw on the die body.
Finally, you will need to reset the seating stem. With the dummy cartridge on the ram in the full up position, lower the seating stem screw until you feel it stop against the top of the bullet and simply tighten the upper locking ring. The die is now configured to seat and crimp in a single step.
We'll discuss the various measurements as we begin the step-by-step reloading process. For now, we simply want to have the dies configured approximately. We will discuss making small final adjustments later.
NEXT WEEK: Setting up the powder dispenser and scale!
Musical Interlude
Here is George Thorogood with One Bourbon, One Scotch, One Beer.
Gun Basics 101
New video from the She Equips Herself gal! This week's video is on a backpack for your gun.
Cigar of the Week
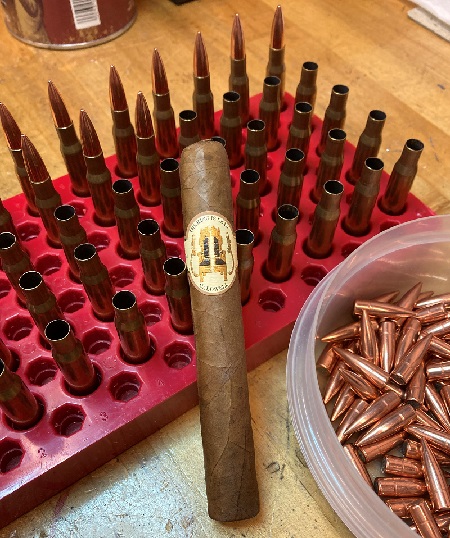
This week our pal rhomboid scores again with this excellent review of the Caldwell's King is Dead
Robert Caldwell is an unconventional American cigar blender who seems to avoid the beaten path. He has most of his cigars made in the Dominican Republic, where he also sources a lot of his leaf, including unusual or little used varieties. And so with his King is Dead, which uses rare leaf such as HVA 20/20 and Negrito. I found this stick to have excellent construction, meaning an easy draw and perfectly even burn. For flavor notes, I got an overall subtle sweetness that reviewers describe as vanilla, and a hint of baking spices on the finish. A nice medium bodied cigar that may strike a slightly different note than most things in your humidor, available online for around $6 and up. I plan to explore Caldwell's other offerings. He has an interesting line of one-time releases called Lost & Found, sourced largely from leaf or cigars he and his team find scouring factories and warehouses. As I said, he seems to follow a slightly different path.
Excellent, rhomboid! Thank you!
Here are some different online cigar vendors. You will find they not only carry different brands and different lines from those brands, but also varying selections of vitolas (sizes/shapes) of given lines. It's good to have options, especially if you're looking for a specific cigar.
Cigarsinternational.com
Cigarpage.com
Famous-smoke.com
Cigarsdaily.com
Neptunecigar.com
Smallbatchcigar.com
Bobalu Cigar Company
Cigarbid.com
A note about sources. The brick & mortar/online divide exists with cigars, as with guns, and most consumer products, with respect to price. As with guns - since both are "persecuted industries", basically - I make a conscious effort to source at least some of my cigars from my local store(s). It's a small thing, but the brick & mortar segment for both guns and tobacco are precious, and worth supporting where you can. And if you're lucky enough to have a good cigar store/lounge available, they're often a good social event with many dangerous people of the sort who own scary gunz, or read smart military blogs like this one. -rhomboid
Anyone have others to include? Perhaps a small local roller who makes a cigar you like? Send me your recommendation and a link to the site!
Ammo Link-O-Rama
I'm really very seriously not kidding around anymore. Buy Ammo
AmmoSeek - online ammo search tool
GunBot - online ammo search tool
SG Ammo
Palmetto State Armory
Georgia Arms
AmmoMan
Target Sports USA
Bud's Gun Shop
This week's mailbag entry is from our pal WTM. Man, no shit!

Please note the new and improved protonmail account gunthread at protonmail dot com. An informal Gun Thread archive can be found HERE. Future expansion plans are in the works for the site Weasel Gun Thread. If you have a question you would like to ask Gun Thread Staff offline, just send us a note and we'll do our best to answer. If you care to share the story of your favorite firearm, send a picture with your nic and tell us what you sadly lost in the tragic canoe accident. If you would like to remain completely anonymous, just say so. Lurkers are always welcome!
That's it for this week - have you been to the range?

rickb223 [/b][/s][/u][/i]: "I demand proof of life from CBD! ..."
She Hobbit (out and about in Middle Earth): "Dour. ..."
Sponge - F*ck Cancer: "Sleeping in, were we? ..."
Sponge - F*ck Cancer: "FIRST!!!!! ..."
rickb223 [/b][/s][/u][/i]: "Corgis called. ..."
From about That Time: "Did this ever show up? ..."
rickb223 [/b][/s][/u][/i]: "Sponge! ..."
Sponge - F*ck Cancer: "[i]https://tinyurl.com/62muwxb7 Art Posted by: ..."
FenelonSpoke: "Posted by: Julia Roberts at July 29, 2026 09:45 ..."
rickb223 [/b][/s][/u][/i]: "Forgive my F5's as I forgive those that F5 against ..."
tubal: "402 Are there any male "hotties" ( or whatever the ..."
The Morning Report — 7/ 29 /26
Daily Tech News 29 July 2026
Tuesday Overnight Open Thread - July 28, 2026 [Doof]
Sick Day Cafe
House Committee Issues Subpoenas to Far-Left Chinese Asset Megadonor Neville Roy Singham
Families of 9/11 Victims Want Terrorist-Loving Communist Zohran Mamdani Banned from 25th Anniversary Remembrance
Mitch McConnell Released from Hospital, But Still Not "Medically Cleared" to Do His Job; Democrat Governor Andy Beshear Demands He Return to Senate or Resign
Revealed: Five Months After Fauci Got Vaccinated, He Suffered a Pulmonary Infarction, an Adverse Effect Associated With the "Vaccine."
He Kept This a Secret.
Zwonitizer Tapes Demonstrate Biden's Serious Cognitive Decline; Massive Amount of NSA/CIA Redactions Show Biden Sharing Tons of Classified Information with a Civilian
Paul Anka Haiku Contest Announcement
Integrity SAT's: Entrance Exam for Paul Anka's Band
AllahPundit's Paul Anka 45's Collection
AnkaPundit: Paul Anka Takes Over the Site for a Weekend (Continues through to Monday's postings)
George Bush Slices Don Rumsfeld Like an F*ckin' Hammer
Democratic Forays into Erotica
New Shows On Gore's DNC/MTV Network
Nicknames for Potatoes, By People Who Really Hate Potatoes
Star Wars Euphemisms for Self-Abuse
Signs You're at an Iraqi "Wedding Party"
Signs Your Clown Has Gone Bad
Signs That You, Geroge Michael, Should Probably Just Give It Up
Signs of Hip-Hop Influence on John Kerry
NYT Headlines Spinning Bush's Jobs Boom
Things People Are More Likely to Say Than "Did You Hear What Al Franken Said Yesterday?"
Signs that Paul Krugman Has Lost His Frickin' Mind
All-Time Best NBA Players, According to Senator Robert Byrd
Other Bad Things About the Jews, According to the Koran
Signs That David Letterman Just Doesn't Care Anymore
Examples of Bob Kerrey's Insufferable Racial Jackassery
Signs Andy Rooney Is Going Senile
Other Judgments Dick Clarke Made About Condi Rice Based on Her Appearance
Collective Names for Groups of People
John Kerry's Other Vietnam Super-Pets
Cool Things About the XM8 Assault Rifle
Media-Approved Facts About the Democrat Spy
Changes to Make Christianity More "Inclusive"
Secret John Kerry Senatorial Accomplishments
John Edwards Campaign Excuses
John Kerry Pick-Up Lines
Changes Liberal Senator George Michell Will Make at Disney
Torments in Dog-Hell
The Ace of Spades HQ Sex-for-Money Skankathon
A D&D Guide to the Democratic Candidates
Margaret Cho: Just Not Funny
More Margaret Cho Abuse
Margaret Cho: Still Not Funny
Iraqi Prisoner Claims He Was Raped... By Woman
Wonkette Announces "Morning Zoo" Format
John Kerry's "Plan" Causes Surrender of Moqtada al-Sadr's Militia
World Muslim Leaders Apologize for Nick Berg's Beheading
Michael Moore Goes on Lunchtime Manhattan Death-Spree
Milestone: Oliver Willis Posts 400th "Fake News Article" Referencing Britney Spears
Liberal Economists Rue a "New Decade of Greed"
Artificial Insouciance: Maureen Dowd's Word Processor Revolts Against Her Numbing Imbecility
Intelligence Officials Eye Blogs for Tips
They Done Found Us Out, Cletus: Intrepid Internet Detective Figures Out Our Master Plan
Shock: Josh Marshall Almost Mentions Sarin Discovery in Iraq
Leather-Clad Biker Freaks Terrorize Australian Town
When Clinton Was President, Torture Was Cool
What Wonkette Means When She Explains What Tina Brown Means
Wonkette's Stand-Up Act
Wankette HQ Gay-Rumors Du Jour
Here's What's Bugging Me: Goose and Slider
My Own Micah Wright Style Confession of Dishonesty
Outraged "Conservatives" React to the FMA
An On-Line Impression of Dennis Miller Having Sex with a Kodiak Bear
The Story the Rightwing Media Refuses to Report!
Our Lunch with David "Glengarry Glen Ross" Mamet
The House of Love: Paul Krugman
A Michael Moore Mystery (TM)
The Dowd-O-Matic!
Liberal Consistency and Other Myths
Kepler's Laws of Liberal Media Bias
John Kerry-- The Splunge! Candidate
"Divisive" Politics & "Attacks on Patriotism" (very long)
The Donkey ("The Raven" parody)